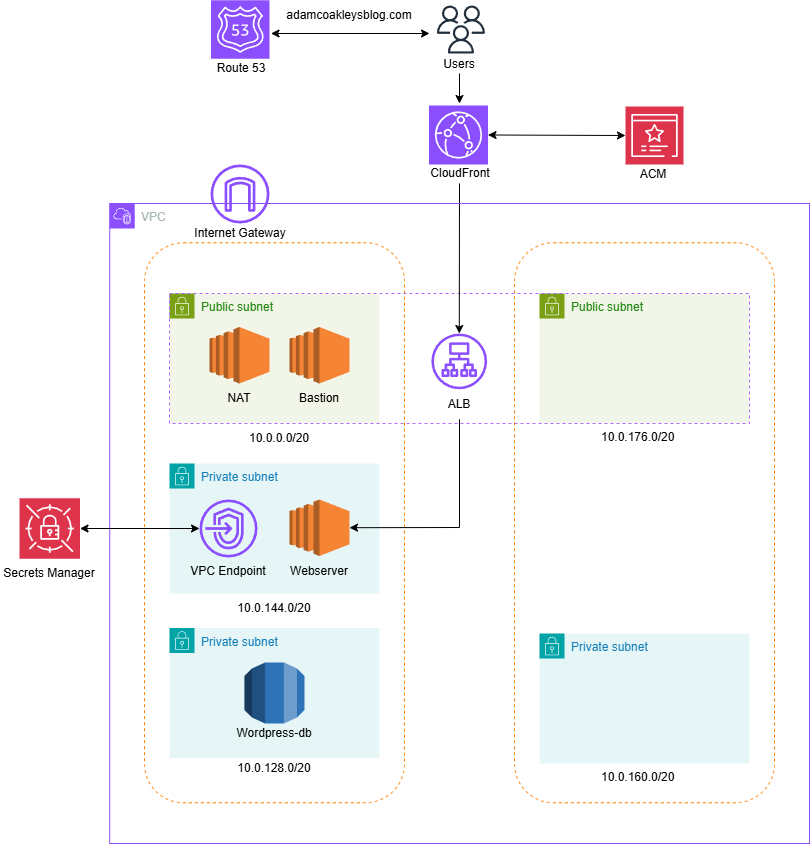
I deployed a WordPress blog site on AWS within a VPC spanning five subnets across two Availability Zones:
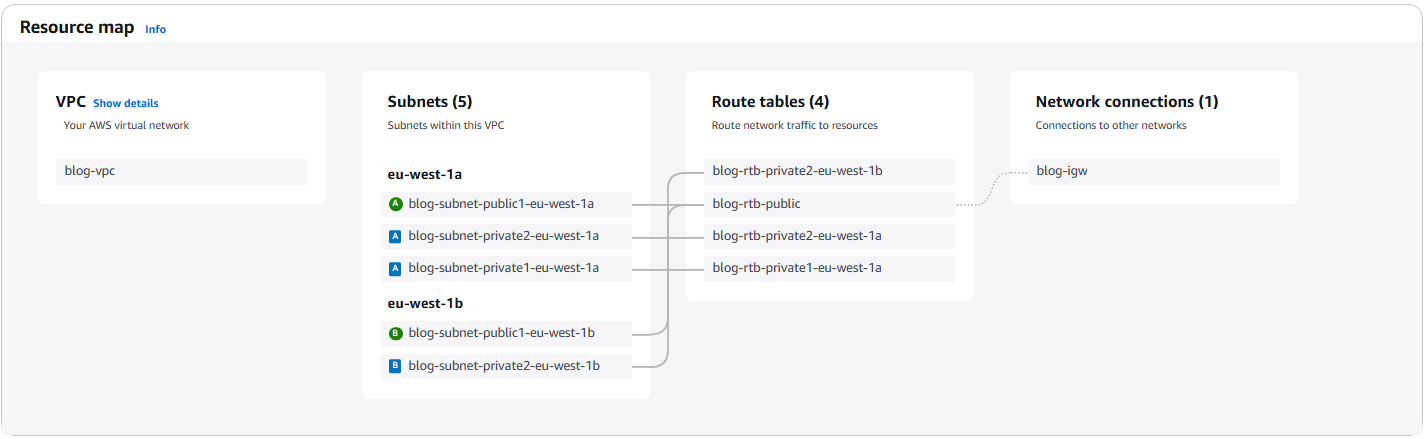
- Public subnets for a NAT instance, Bastion Host, and Application Load Balancer (ALB).
- Private subnets for the web server and Amazon RDS (MySQL).
Traffic is managed through an ALB, with Route 53 handling DNS and an ACM SSL certificate securing connections. Security groups enforce strict access controls, and all necessary software (Apache, PHP, WordPress) is installed on the webserver. The site is now live and accessible via its domain.
Installing SSM Agent
To improve access management, I created an EC2SSMRole with the AmazonSSMManagedInstanceCore IAM policy attached. I also installed the SSM Agent on each server, enabling AWS Systems Manager Session Manager for direct access—eliminating the need for the Bastion Host.
sudo yum install -y https://s3.amazonaws.com/ec2-downloads-windows/SSMAgent/latest/linux_amd64/amazon-ssm-agent.rpm
sudo systemctl start amazon-ssm-agent
Configuring Security Groups
Each component received appropriate security group rules:
- Bastion Host: SSH (Port 22) from trusted IPs
- NAT Instance: Allow outbound traffic for instances in private subnets
- Web Server: Allow HTTP(S) traffic only from ALB
- RDS: Allow MySQL traffic only from the web server
Setting Up Private Route Table
To route traffic from private instances to the internet via the NAT instance, I updated the private route table to forward all internet-bound traffic through the NAT instance.
Disabling Source/Destination Check on NAT Instance
For the NAT instance to function properly, I disabled Source/Destination Check on it.
Configuring NAT Instance
To enable NAT functionality, I executed the following commands on the NAT instance:
echo "net.ipv4.ip_forward = 1" | sudo tee -a /etc/sysctl.conf
sudo sysctl -p
sudo iptables -t nat -A POSTROUTING -o enX0 -s 0.0.0.0/0 -j MASQUERADE
To make the rule persistent:
sudo yum install -y iptables-services
sudo service iptables save
sudo systemctl enable iptables
Setting Up RDS for WordPress
When I configured an RDS instance for WordPress with MySQL, I chose a single Availability Zone (AZ) deployment for cost reasons. Despite using just one AZ, I still had to create a DB subnet group with two subnets, as this is a requirement for RDS. I placed these subnets in different AZs and ensured they were both private to keep the database instance secure and isolated from the public internet. The creation of the RDS instance provided me with an endpoint that I could use later within my wp-config.php file.
When I set up the RDS instance for WordPress with MySQL, I also created two secrets in AWS Secrets Manager for added security. The first secret stored the RDS endpoint, and the second contained the RDS username and password. By using Secrets Manager, I ensured that sensitive credentials were securely managed and not hardcoded in the wp-config.php file.
Installing and Configuring WordPress
On the webserver, I installed the necessary packages:
sudo dnf install -y httpd wget php-fpm php-mysqli php-json php php-develNext, I installed WordPress:
wget https://wordpress.org/latest.tar.gz
tar -xzf latest.tar.gz
I configured database secrets retrieval using AWS Secrets Manager by creating a secrets.php file in the home directory. Using the AWS SDK for PHP, the script securely fetched the MySQL credentials and RDS endpoint stored in Secrets Manager.
<?php
require '/var/www/html/vendor/autoload.php';
use Aws\SecretsManager\SecretsManagerClient;
use Aws\Exception\AwsException;

$client = new SecretsManagerClient([
    'region' => 'eu-west-1',
    'version' => '2017-10-17',
]);

$dbSecretName = 'blog/wp/mysql';
$rdsSecretName = 'blog/wp/rds_endpoint';

try {
    $dbResult = $client->getSecretValue(['SecretId' => $dbSecretName]);
    $rdsResult = $client->getSecretValue(['SecretId' => $rdsSecretName]);
} catch (AwsException $e) {
    error_log("AWS Secrets Manager Error: " . $e->getMessage());
    exit("Database connection error. Please check Secrets Manager.");
}

if (isset($dbResult['SecretString'])) {
    $dbSecret = json_decode($dbResult['SecretString'], true);
} else {
    $dbSecret = json_decode(base64_decode($dbResult['SecretBinary']), true);
}

$username = $dbSecret['username'] ?? null;
$password = $dbSecret['password'] ?? null;

if (isset($rdsResult['SecretString'])) {
    $rdsSecret = json_decode($rdsResult['SecretString'], true);
} else {
    $rdsSecret = json_decode(base64_decode($rdsResult['SecretBinary']), true);
}

if (!isset($rdsSecret['rds_endpoint'])) {
    error_log("Error: 'rds_endpoint' key not found in Secrets Manager response.");
    exit("Database configuration error. Please check Secrets Manager.");
}
$rdsEndpoint = $rdsSecret['rds_endpoint'];

return [
    'username'    => $username,
    'password'    => $password,
    'rds_endpoint' => $rdsEndpoint,
];
?>
Then, I updated wp-config.php with the database credentials and endpoint retrieved from Secrets Manager – see code snippet below.
// Include the secrets file
$secrets = require '/home/ec2-user/secrets.php';

/** The name of the database for WordPress */
define( 'DB_NAME', 'blog-wp-database' );

/** Database username */
define( 'DB_USER', $secrets['username'] );

/** Database password */
define( 'DB_PASSWORD', $secrets['password'] );

/** Database hostname */
define( 'DB_HOST', $secrets['rds_endpoint'] );
To ensure secure and cost-effective access to AWS Secrets Manager without routing traffic over the internet, I created a VPC Endpoint for Secrets Manager within my VPC. This allowed my web server to communicate with Secrets Manager using private IPs instead of public AWS endpoints. Additionally, I created a dedicated security group for the VPC Endpoint, allowing inbound traffic only from the web server’s security group. This setup restricted access to only necessary resources, eliminating unnecessary data transfer costs over the internet.
Configuring Route 53 and SSL with ALB
To enhance security and improve availability:
- I registered a Route 53 domain.
- Requested an ACM certificate for SSL encryption.
- Created an Application Load Balancer (ALB) with the SSL certificate.
- Updated Route 53 DNS records to point to the ALB.
- Configured Target Groups and Listeners to redirect HTTP traffic to HTTPS.
Fixing Redirect Issues
I encountered an issue where my website wasn’t loading due to redirection errors. Adding the following lines in wp-config.php resolved it:
/* SSL settings */
define('FORCE_SSL_ADMIN', true);

/* Turn HTTPS 'on' if HTTP_X_FORWARDED_PROTO matches 'https' */
if (strpos($_SERVER['HTTP_X_FORWARDED_PROTO'], 'https') !== false) {
    $_SERVER['HTTPS'] = 'on';
}
Final Architecture
My site is now live on the domain!